
Building a real-time big data pipeline (9: Spark MLlib, Regression, Python)
Published:
Updated on February 08, 2021
Apache Spark expresses parallelism by three sets of APIs - DataFrames, DataSets and RDDs (Resilient Distributed Dataset); why and when you should use each set.
Originally, spark was designed to read and write data from and to Hadoop Distributed File System (HDFS). A Hadoop cluster is composed of a network of master, worker and client nodes that orchestrate and execute the various jobs across the HDFS. The master nodes include a NameNode, Secondary NameNode, and JobTracker while the workers consist of virtual machines, running both DataNode and TaskTracker services, and do the actual work of storing and processing the jobs as directed by the master nodes. The Client Nodes are responsible for loading the data and fetching the results.
MLlib is Apache Spark’s machine learning library, with APIs in Java, Scala, Python, and R1 2 3. MLlib provides many utilities useful for machine learning tasks, such as: classification, regression, clustering and dimentionality reduction.
The PySpark (Spark Python API) exposes the Spark programming model to Python.
Python, or R, data frame exists on one machine rather than multiple machines. If you want to do distributed computation, then you’ll need to perform operations on Spark data frames. This has been achieved by taking advantage of the SparkR4 or PySpark APIs. Spark’s dataframe object can be thought of as a table distributed across a cluster and has functionality that is similar to dataframe in R or Python.
1. Hadoop/HDFS installation
See for How to install, start and stop hadoop ecosystem.
2. Copying data to HDFS
$hadoop fs -copyFromLocal *.csv /user/adinasarapu
Verify the files using ls command.
$hadoop fs -ls /user/adinasarapu
-rw-r--r--   1 adinasa supergroup     164762 2020-08-18 17:39 /user/adinasarapu/data_proteomics.csv
-rw-r--r--   1 adinasa supergroup        786 2020-08-18 17:39 /user/adinasarapu/samples_proteomics.csv
Open a web browser to see your configurations for the current session.
Web UI
for HDFS: http://localhost:9870
for YARN Resource Manager: http://localhost:8088
3. PySpark installation
PySpark communicates with the Scala-based Spark via the Py4J library. Py4J isn’t specific to PySpark or Spark. Py4J allows any Python program to talk to JVM-based code.
Configuring Eclipse with Python and Spark on Hadoop
Installing PyDev. (http://www.pydev.org/updates)
From the Eclipse IDE:
Go to the menu Help > Install New Software…
Configuring PyDev with a Python interpreter
Go to the menu Eclipse > Preferences… (on Mac)
Go to PyDev > Interpreters > Python Interpreter
Selected a Python interpreter version v3.9: /usr/local/bin/python3.9
Now PyDev is configured in Eclipse. You can develop in Python but not with Spark yet.
Configuring PyDev with Spark’s variables and Py4J
Check out that you are on the PyDev perspective.
Go to the menu Eclipse > Preferences… (on Mac),
Go to PyDev > Interpreters > Python Interpreter
Click on the tab [Environment].
Click on the button [Add…] to add new variable.
Add the following variables as shown in the examples below then validate:
PYSPARK_PYTHON /Library/Frameworks/Python.framework/Versions/3.9/bin
HADOOP_HOME	/Users/adinasa/bigdata/hadoop-3.2.1
SPARK_CONF_DIR	${project_loc}/conf
SPARK_HOME	/Users/adinasa/bigdata/spark-3.0.0-bin-hadoop3.2
SPARK_LOCAL_IP	127.0.0.1
TERM	xterm-256color
You are now going to configure PyDev with Py4J (the bridge between Python and Java), this package is already included in PySpark.
Click on the tab [Libraries].
Click on the button [New Egg/Zip(2)…] to add new library.
Choose the file py4j-0.8.2.1-src.zip just under your Spark folder python/lib and validate.
4. Create a Python project
Create a source folder:
To add a source folder in order to create your Python source, right-click on the project icon and do: New > Folder
Name the new folder “src”, then click on the button [Finish].
Create a conf folder:
To add a source folder in order to create your Python source, right-click on the project icone and do: New > Folder
Name the new folder “conf”, then click on the button [Finish].
Create the new project:
Check that you are on the PyDev perspective.
Go to the Eclipse menu File > New > PyDev project
Name your new project “PySparkProject”, then click on the button [Finish].
Create your source code:
To add your new Python source, right-click on the source folder icon and do: New > PyDev Module.
Name the new Python source “PySparkML”, then click on the button [Finish], then click on the button [OK].
To execute your code, right-click on the Python module “PySparkML.py”, then choose Run As > 1 Python Run.
“The entry-point of any PySpark program is a SparkContext object. This object allows you to connect to a Spark cluster and create RDDs. The local[*] string is a special string denoting that you’re using a local cluster, which is another way of saying you’re running in single-machine mode. The * tells Spark to create as many worker threads as logical cores on your machine. Creating a SparkContext can be more involved when you’re using a cluster. To connect to a Spark cluster, you might need to handle authentication and a few other pieces of information specific to your cluster”_ Source https://realpython.com
Since Spark 2.x, a new entry point called SparkSession has been introduced that essentially combined all functionalities available in Spark 1.x (entry ponits SparkContext, SQLContext and HiveContext).
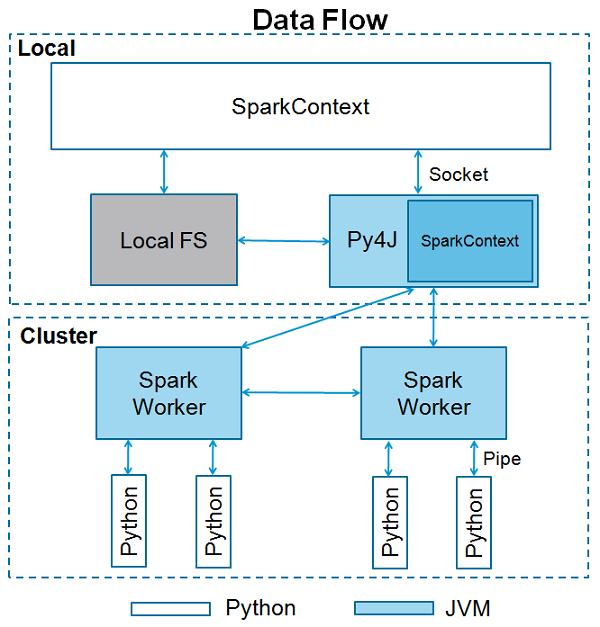
Image source https://www.tutorialspoint.com
Contents from PySparkML.py file with details
from pyspark.conf import SparkConf
from pyspark.context import SparkContext
from pyspark.sql import SparkSession
from pyspark.sql.functions import when

conf = SparkConf()
conf.setMaster('local[*]')
conf.setAppName('MyApp')
# conf.set(key, value)
conf.set("spark.executor.memory", '4g')
conf.set('spark.executor.cores', '1')
conf.set('spark.cores.max', '1')
conf.set("spark.driver.memory",'4g')
SparkContext is available as sc by default.
If you are using the spark-shell, SparkContext is already available through the variable called sc. To create a new SparkContext, first you need to stop the default SparkContext.
# sc.stop()
SparkContext().stop()
SparkSession gives access to SparkContext.
# sc = SparkContext(conf=conf)

spark = SparkSession.builder.config(conf=conf).getOrCreate()
sc = spark.sparkContext

txt = sc.textFile('hdfs://localhost:9000/user/adinasarapu/samples_proteomics.csv')
print(txt.collect())
You can start creating Resilient Distributed Datasets (RDDs) once you have a SparkContext.
One way to create RDDs is to read a file with textFile() method. RDDs are one of the foundational data structures in Spark. A single RDD can be divided into multiple logical partitions so that these partitions can be stored and processed on different machines of a cluster. RDDs are immutable (read-only) in nature. You cannot change an original RDD, but you can create new RDDs by performing operations, like transformations, on an existing RDD. An RDD in Spark can be cached and used again for future transformations. RDDs are said to be lazily evaluated, i.e., they delay the evaluation until it is really needed.
What are the limitations of RDD in Apache Spark?
RDD does not provide schema view of data. It has no provision for handling structured data. Dataset and DataFrame provide the Schema view of data. DataFrame is a distributed collection of data organized into named columns. Spark DataFrames can be created from various sources, such as external files or databases, or the existing RDDs. DataFrames allow the processing of huge amounts of data. Datasets are an extension of the DataFrame APIs in Spark. In addition to the features of DataFrames and RDDs, datasets provide various other functionalities. They provide an object-oriented programming interface, which includes the concepts of classes and objects.
You can start creating a DataFrame once you have a SparkSession.
A SparkSession can be used create DataFrame, register DataFrame as tables, execute SQL over tables, cache tables etc.
Creating Spark DataFrame from CSV file:
df = spark.read.format('csv').option('header',True).option('multiLine', True).load('hdfs://localhost:9000/user/adinasarapu/samples_proteomics.csv')
df.show()
+--------+-------+-------+---+------+
|SampleID|Disease|Genetic|Age|   Sex|
+--------+-------+-------+---+------+
|     D_2|    Yes|     No| 63|female|
|     D_7|    Yes|     No| 78|female|
|    D_12|    Yes|     No| 65|female|
|    D_17|    Yes|     No| 58|female|
|    D_22|    Yes|     No| 65|female|
|    D_27|    Yes|     No| 50|female|
|    D_32|    Yes|     No| 67|female|
|    D_37|    Yes|     No| 80|female|
|    D_42|    Yes|     No| 66|female|
|    D_47|    Yes|     No| 64|female|
|    DG_3|    Yes|    Yes| 76|female|
|    DG_8|    Yes|    Yes| 56|female|
|   DG_13|    Yes|    Yes| 81|female|
|   DG_18|    Yes|    Yes| 69|female|
|   DG_23|    Yes|    Yes| 60|female|
|   DG_28|    Yes|    Yes| 63|female|
|   DG_33|    Yes|    Yes| 70|female|
|   DG_38|    Yes|    Yes| 46|female|
|   DG_43|    Yes|    Yes| 65|female|
|   DG_48|    Yes|    Yes| 77|female|
+--------+-------+-------+---+------+
only showing top 20 rows
print(df)
DataFrame[SampleID: string, Disease: string, Genetic: string, Age: string, Sex: string]
Replacing Yes or No with 1 or 0
newDf = df.withColumn('Disease', when(df['Disease'] == 'Yes', 1).otherwise(0))
newDf = newDf.withColumn('Genetic', when(df['Genetic'] == 'Yes', 1).otherwise(0))
newDf.show()

+--------+-------+-------+---+------+
|SampleID|Disease|Genetic|Age|   Sex|
+--------+-------+-------+---+------+
|     D_2|      1|      0| 63|female|
|     D_7|      1|      0| 78|female|
|    D_12|      1|      0| 65|female|
|    D_17|      1|      0| 58|female|
|    D_22|      1|      0| 65|female|
|    D_27|      1|      0| 50|female|
|    D_32|      1|      0| 67|female|
|    D_37|      1|      0| 80|female|
|    D_42|      1|      0| 66|female|
|    D_47|      1|      0| 64|female|
|    DG_3|      1|      1| 76|female|
|    DG_8|      1|      1| 56|female|
|   DG_13|      1|      1| 81|female|
|   DG_18|      1|      1| 69|female|
|   DG_23|      1|      1| 60|female|
|   DG_28|      1|      1| 63|female|
|   DG_33|      1|      1| 70|female|
|   DG_38|      1|      1| 46|female|
|   DG_43|      1|      1| 65|female|
|   DG_48|      1|      1| 77|female|
+--------+-------+-------+---+------+
only showing top 20 rows
Change Column type and select required columns for model building
newDf = newDf.withColumn("Disease",newDf["Disease"].cast('double'))
newDf = newDf.withColumn("Genetic",newDf["Genetic"].cast('double'))
newDf = newDf.withColumn("Age",newDf["Age"].cast('double'))
newDf.show()
+--------+-------+-------+----+------+
|SampleID|Disease|Genetic| Age|   Sex|
+--------+-------+-------+----+------+
|     D_2|    1.0|    0.0|63.0|female|
|     D_7|    1.0|    0.0|78.0|female|
|    D_12|    1.0|    0.0|65.0|female|
|    D_17|    1.0|    0.0|58.0|female|
|    D_22|    1.0|    0.0|65.0|female|
|    D_27|    1.0|    0.0|50.0|female|
|    D_32|    1.0|    0.0|67.0|female|
|    D_37|    1.0|    0.0|80.0|female|
|    D_42|    1.0|    0.0|66.0|female|
|    D_47|    1.0|    0.0|64.0|female|
|    DG_3|    1.0|    1.0|76.0|female|
|    DG_8|    1.0|    1.0|56.0|female|
|   DG_13|    1.0|    1.0|81.0|female|
|   DG_18|    1.0|    1.0|69.0|female|
|   DG_23|    1.0|    1.0|60.0|female|
|   DG_28|    1.0|    1.0|63.0|female|
|   DG_33|    1.0|    1.0|70.0|female|
|   DG_38|    1.0|    1.0|46.0|female|
|   DG_43|    1.0|    1.0|65.0|female|
|   DG_48|    1.0|    1.0|77.0|female|
+--------+-------+-------+----+------+
only showing top 20 rows
Preparing data for Machine Learning.
In statistical modeling, regression analysis focuses on investigating the relationship between a dependent variable and one or more independent variables.
In data mining, Regression is a model to represent the relationship between the value of lable ( or target, it is numerical variable) and on one or more features (or predictors they can be numerical and categorical variables).
We need only two columns — features (Genetic and Age) and label (“Disease”)
from pyspark.ml.feature import VectorAssembler
vectorAssembler = VectorAssembler(inputCols = ['Genetic','Age'], outputCol = 'features')
vhouse_df = vectorAssembler.transform(newDf)
Subset Dataset
vhouse_df = vhouse_df.select(['features', 'Disease'])
vhouse_df.show()
from pyspark.ml.regression import GeneralizedLinearRegression
glr = GeneralizedLinearRegression(featuresCol = "features", labelCol="Disease", maxIter=10, regParam=0.3, family="gaussian", link="identity")
lr_model = glr.fit(vhouse_df)
Summarize the model over the training set
trainingSummary = lr_model.summary
print("Coefficients: " + str(lr_model.coefficients))
print("Intercept: " + str(lr_model.intercept))
5. Results
Coefficients: [0.2797034064149404,0.008458887145555321]
Intercept: 0.04080427059655318
Finally, shutting down the HDFS
You can stop all the daemons using the command stop-all.sh. You can also start or stop each daemon separately.
$bash stop-all.sh
Stopping namenodes on [localhost]
Stopping datanodes
Stopping secondary namenodes [Ashoks-MacBook-Pro.2.local]
Stopping nodemanagers
Stopping resourcemanager
Further reading…
Logistic Regression in Spark ML
Logistic Regression with Apache Spark
Feature Transformation
PySpark: Apache Spark with Python
SparkR and Sparking Water
Integrate SparkR and R for Better Data Science Workflow
A Compelling Case for SparkR
Spark – How to change column type?
SparkRext - SparkR extension for closer to dplyr
Scala Vs Python Vs R Vs Java - Which language is better for Spark & Why?