Building a real-time big data pipeline (6: Spark Core, Hadoop, SBT)
Published:
Updated on August 21, 2020
Apache Spark1 is an open-source cluster computing system that provides high-level APIs in Java, Scala, Python and R. Spark also packaged with higher-level libraries for SQL, machine learning (MLlib), streaming, and graphs (GraphX).
1. Hadoop/HDFS
The Hadoop Distributed File System (HDFS) is the primary data storage system used by Hadoop applications. It employs a NameNode and DataNode architecture to implement a distributed file system that provides high-performance access to data across highly scalable Hadoop clusters.2
First format the HDFS (one time)
$hadoop namenode -format
Start HDFS: The following command will start the namenode as well as the data nodes as cluster.
cd /Users/adinasa/bigdata/hadoop-3.2.1
$bash sbin/start-dfs.sh
Create a directory
$source ~/.bash_profile
$hadoop fs -mkdir -p /user/adinasarapu
Insert data into HDFS: Use -copyFromLocal command to move one or more files from local location to HDFS.
$hadoop fs -copyFromLocal *.csv /user/adinasarapu
Verify the files using ls command.
$hadoop fs -ls /user/adinasarapu
-rw-r--r--   1 adinasa supergroup     164762 2020-08-18 17:39 /user/adinasarapu/data_proteomics.csv
-rw-r--r--   1 adinasa supergroup        786 2020-08-18 17:39 /user/adinasarapu/samples_proteomics.csv
hadoop fs is more generic command that allows you to interact with multiple file systems like local, HDFS etc. This can be used when you are dealing with different file systems such as local FS, (S)FTP, S3, and others.
hdfs dfs is the command that is specific to HDFS.
$hdfs dfs -ls /user/adinasarapu
-rw-r--r--   1 adinasa supergroup     164762 2020-08-18 17:39 /user/adinasarapu/data_proteomics.csv
-rw-r--r--   1 adinasa supergroup        786 2020-08-18 17:39 /user/adinasarapu/samples_proteomics.csv
See HDFS, Yarn & MapReduce for hadoop architecture in detail.
Start YARN with the script: start-yarn.sh
$bash start-yarn.sh
Starting resourcemanager
Starting nodemanagers
Check the list of Java processes running in your system by using the command jps. If you are able to see the Hadoop daemons running after executing the jps command, we can safely assume that the Hadoop cluster is running.
$jps
96899 NodeManager
91702 SecondaryNameNode
96790 ResourceManager
97240 Jps
91437 NameNode
91550 DataNode
Open a web browser to see your configurations for the current session.
Web UI
for HDFS: http://localhost:9870
for YARN Resource Manager: http://localhost:8088
Shutting Down the HDFS:
You can stop all the daemons using the command stop-all.sh. You can also start or stop each daemon separately.
$bash stop-all.sh
Stopping namenodes on [localhost]
Stopping datanodes
Stopping secondary namenodes [Ashoks-MacBook-Pro.2.local]
Stopping nodemanagers
Stopping resourcemanager
Note: Hadoop can be installed in 3 different modes: standalone mode, pseudo-distributed mode and fully distributed mode. In fully distributed mode, replace the ‘’localhost’ with actual host name of machine on cluster.
2. Apache Spark
Spark’s shells provide simple ways to work interactively with Spark.
spark-shellwill launch the Scala interpreter (runs on Java VM); :q for exit it.pysparkwill launch the Python interpreter; exit() for exit it.sparkRwill the R interpreter; q() for exit it.spark-sqlfor working with structured data; exit; for exit it.
Start Spark with spark-shell
source ~/.bashrc_profile
$spark-shell
scala>
Read csv file from HDFS into a Spark DataFrame
scala> val df = spark.read.format("csv").option("header", "true").load("hdfs://localhost:9000/user/adinasarapu/samples_proteomics.csv")
scala> df.show
+--------+-------+-------+---+------+
|SampleID|Disease|Genetic|Age|   Sex|
+--------+-------+-------+---+------+
|     D_2|    Yes|     No| 63|female|
|     D_7|    Yes|     No| 78|female|
|    D_12|    Yes|     No| 65|female|
|    D_17|    Yes|     No| 58|female|
|    D_22|    Yes|     No| 65|female|
|    D_27|    Yes|     No| 50|female|
|    D_32|    Yes|     No| 67|female|
|    D_37|    Yes|     No| 80|female|
|    D_42|    Yes|     No| 66|female|
|    D_47|    Yes|     No| 64|female|
|    DG_3|    Yes|    Yes| 76|female|
|    DG_8|    Yes|    Yes| 56|female|
|   DG_13|    Yes|    Yes| 81|female|
|   DG_18|    Yes|    Yes| 69|female|
|   DG_23|    Yes|    Yes| 60|female|
|   DG_28|    Yes|    Yes| 63|female|
|   DG_33|    Yes|    Yes| 70|female|
|   DG_38|    Yes|    Yes| 46|female|
|   DG_43|    Yes|    Yes| 65|female|
|   DG_48|    Yes|    Yes| 77|female|
+--------+-------+-------+---+------+
only showing top 20 rows
For more details visit Spark Read CSV file into DataFrame
Select & filter the Spark DataFrame
scala> val sel = df.select("SampleID","Disease","Age","Sex").filter($"Disease".like("No"))
scala> sel.show

OR

df.select("*").filter($"Disease".like("No")).show()
The dollar sign here is making “Disease” a variable (of type Column).
scala> sel.show
+----------+-------+---+------+
|  SampleID|Disease|Age|   Sex|
+----------+-------+---+------+
| Control_1|     No| 66|female|
| Control_6|     No| 68|female|
|Control_11|     No| 68|female|
|Control_16|     No| 41|female|
|Control_21|     No| 76|female|
|Control_26|     No| 60|female|
|Control_31|     No| 51|female|
|Control_36|     No| 55|female|
|Control_41|     No| 43|female|
|Control_46|     No| 42|female|
+----------+-------+---+------+
Write the resulting DataFrame back to HDFS
scala> sel.write.option("header","true").csv("hdfs://localhost:9000/user/adinasarapu/samples_filtered.csv")
Here is a script, interactively, list all the files within a HDFS directory using Scala/Spark. Make sure to download hadoop-client-3.2.0.jar, hadoop-common-3.2.0.jar and “hadoop-hdfs-client-3.2.0.jar” files into $SPARK_HOME/jars directory.
scala> import java.net.URI
scala> import org.apache.hadoop.conf.Configuration
scala> import org.apache.hadoop.fs.{FileSystem, Path}

scala> val uri = new URI("hdfs://localhost:9000")
scala> val fs = FileSystem.get(uri,new Configuration())
scala> val filePath = new Path("/user/adinasarapu/")
scala> val status = fs.listStatus(filePath)
scala> status.map(sts => sts.getPath).foreach(println)

hdfs://localhost:9000/user/adinasarapu/data_proteomics.csv
hdfs://localhost:9000/user/adinasarapu/samples_filtered.csv
hdfs://localhost:9000/user/adinasarapu/samples_proteomics.csv
Let’s run the above scripts using SBT, an alternative to spark-shell.
3. The Scala Build Tool (SBT)
SBT is an interactive build tool for Scala, Java, and more. It requires Java 1.8 or later.
$brew install sbt
Start sbt
$sbt
[info] [launcher] getting org.scala-sbt sbt 1.3.13  (this may take some time)...
downloading https://repo1.maven.org/maven2/org/scala-sbt/sbt/1.3.13/sbt-1.3.13.jar ...
...
...

[info] Fetched artifacts of
[info] set current project to adinasa (in build file:/Users/adinasa/)
[info] sbt server started at local:///Users/adinasa/.sbt/1.0/server/a09586e01e6aaffd93e6/sock
sbt:adinasa>
To leave sbt shell, type exit
[info] shutting down sbt server
The following is an excerpt from How to create an SBT project directory structure
Create the project
cd to an empy directory
cd /Users/adinasa/Documents/bigdata/proteomics
Run the following Unix shell script which creates the initial set of files and directories you’ll want for most projects:
cretate_sbt_project.sh
#!/bin/sh

PROJ_DIR="PROJ_DIR="/Users/adinasa/Documents/bigdata/proteomics""

cd $PROJ_DIR

mkdir -p src/{main,test}/{java,resources,scala}
mkdir lib project target

# create an initial build.sbt file
echo 'name := "MyProject"
version := "1.0"
scalaVersion := "2.12.10"' > build.sbt
If you have the tree command on your system and run it from the current directory, you’ll see that the basic directory structure looks like this:
.
├── build.sbt
├── lib
├── project
├── src
│   ├── main
│   │   ├── java
│   │   ├── resources
│   │   └── scala
│   └── test
│       ├── java
│       ├── resources
│       └── scala
└── target
build.sbt
The build.sbt file is SBT’s basic configuration file. You define most settings that SBT needs in this file, including specifying library dependencies, repositories, and any other basic settings your project requires.
The dependencies are in Maven format, with % separating the parts. The %% means that it will automatically add the specific Scala version to the dependency name.
Update the build.sbt file
name := "MyProject"
version := "1.0"
scalaVersion := "2.12.10"
libraryDependencies += "org.apache.hadoop" % "hadoop-common" % "3.2.0";
libraryDependencies += "org.apache.hadoop" % "hadoop-hdfs-client" % "3.2.0";
libraryDependencies += "org.apache.spark" %% "spark-core" % "3.0.0";
libraryDependencies += "org.apache.spark" %% "spark-sql" % "3.0.0"
Type console to start a REPL session from inside SBT: (from the directory where build.sbt is present)
$sbt
$console

OR

$sbt console

scala>

scala> import java.net.URI
scala> import org.apache.hadoop.conf.Configuration
scala> import org.apache.hadoop.fs.{FileSystem, Path}

scala> val uri = new URI("hdfs://localhost:9000")
scala> val fs = FileSystem.get(uri,new Configuration())
scala> val filePath = new Path("/user/adinasarapu/")
scala> val status = fs.listStatus(filePath)
scala> status.map(sts => sts.getPath).foreach(println)
Finally, exit :q
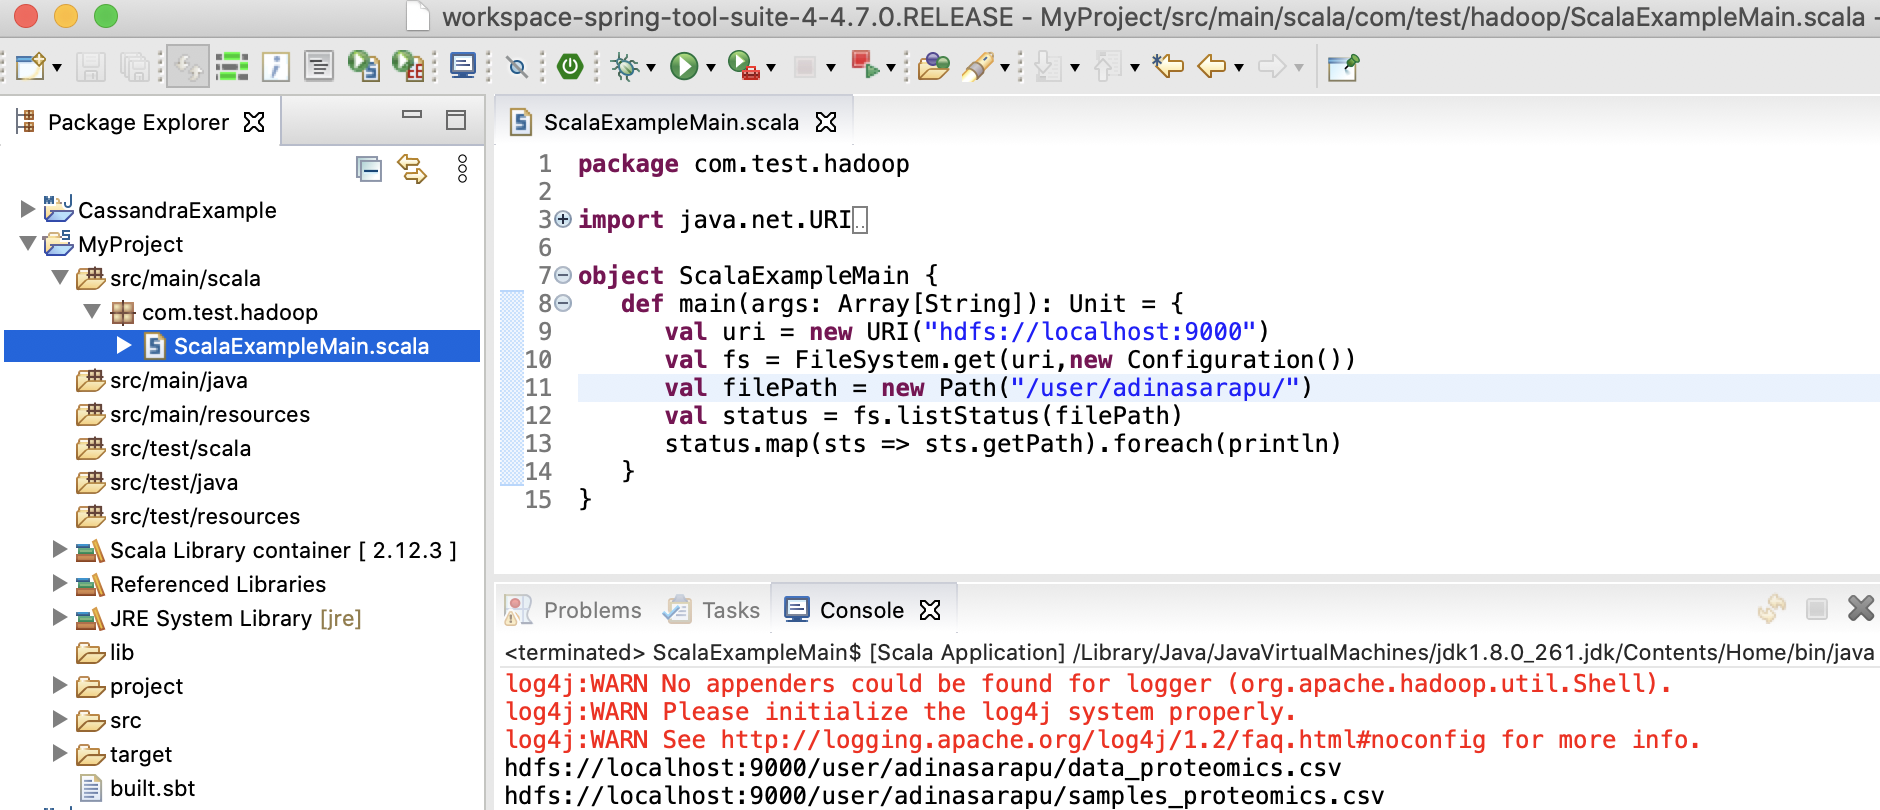
Scala application with main method
Create a file named ScalaExampleMain.scala in the src/main/scala directory. In Scala, the file’s package name doesn’t have to match the directory name.
package com.test.hadoop

import java.net.URI
import org.apache.hadoop.conf.Configuration
import org.apache.hadoop.fs.{FileSystem, Path}

object ScalaExampleMain {
   def main(args: Array[String]): Unit = {
      val uri = new URI("hdfs://localhost:9000")
      val fs = FileSystem.get(uri,new Configuration())
      val filePath = new Path("/user/adinasarapu/")
      val status = fs.listStatus(filePath)
      status.map(sts => sts.getPath).foreach(println)
   }
}
Update the build.sbt file with mainClass := Some("com.test.hadoop.ScalaExampleMain")
name := "MyProject"
version := "1.0"
scalaVersion := "2.12.10"
mainClass := Some("com.test.hadoop.ScalaExampleMain")
libraryDependencies += "org.apache.hadoop" % "hadoop-common" % "3.2.0";
libraryDependencies += "org.apache.hadoop" % "hadoop-hdfs-client" % "3.2.0";
libraryDependencies += "org.apache.spark" %% "spark-core" % "3.0.0";
libraryDependencies += "org.apache.spark" %% "spark-sql" % "3.0.0"
Compile the project:sbt compile
[info] welcome to sbt 1.3.13 (Oracle Corporation Java 1.8.0_261)
[info] loading project definition from /Users/adinasa/Documents/bigdata/proteomics/project
[info] loading settings for project proteomics from build.sbt ...
[info] set current project to MyProject (in build file:/Users/adinasa/Documents/bigdata/proteomics/)
[info] Executing in batch mode. For better performance use sbt's shell
[info] Compiling 1 Scala source to /Users/adinasa/Documents/bigdata/proteomics/target/scala-2.12/classes ...
[success] Total time: 3 s, completed Aug 19, 2020 3:04:57 PM
Run the project:sbt run
[info] welcome to sbt 1.3.13 (Oracle Corporation Java 1.8.0_261)
[info] loading project definition from /Users/adinasa/Documents/bigdata/proteomics/project
[info] loading settings for project proteomics from build.sbt ...
[info] set current project to MyProject (in build file:/Users/adinasa/Documents/bigdata/proteomics/)
[warn] There may be incompatibilities among your library dependencies; run 'evicted' to see detailed eviction warnings.
[info] running com.test.hadoop.ScalaExampleMain
log4j:WARN No appenders could be found for logger (org.apache.hadoop.util.Shell).
log4j:WARN Please initialize the log4j system properly.
log4j:WARN See http://logging.apache.org/log4j/1.2/faq.html#noconfig for more info.
hdfs://localhost:9000/user/adinasarapu/data_proteomics.csv
hdfs://localhost:9000/user/adinasarapu/samples_filtered.csv
hdfs://localhost:9000/user/adinasarapu/samples_proteomics.csv
[success] Total time: 6 s, completed Aug 19, 2020 3:18:28 PM
Package the project:sbt package
[info] welcome to sbt 1.3.13 (Oracle Corporation Java 1.8.0_261)
[info] loading project definition from /Users/adinasa/Documents/bigdata/proteomics/project
[info] loading settings for project proteomics from build.sbt ...
[info] set current project to MyProject (in build file:/Users/adinasa/Documents/bigdata/proteomics/)
[success] Total time: 1 s, completed Aug 20, 2020 1:17:56 PM
The JAR file created with sbt package is a normal Java JAR file. You can list its contents with the usual jar tvf command:
$jar tvf target/scala-2.12/myproject_2.12-1.0.jar
 297 Thu Aug 20 13:00:02 EDT 2020 META-INF/MANIFEST.MF
   0 Thu Aug 20 13:00:02 EDT 2020 com/
   0 Thu Aug 20 13:00:02 EDT 2020 com/test/
   0 Thu Aug 20 13:00:02 EDT 2020 com/test/hadoop/
 751 Thu Aug 20 12:59:40 EDT 2020 com/test/hadoop/ScalaExampleMain.class
3567 Thu Aug 20 12:59:40 EDT 2020 com/test/hadoop/ScalaExampleMain$.class
How to configure SBT to work with Eclipse
sbteclipse is a plugin for sbt to create Eclipse project definitions.
Update the project-specific file at <PROJ_DIR>/project/plugins.sbt
addSbtPlugin("com.typesafe.sbteclipse" % "sbteclipse-plugin" % "5.2.4")
Run sbt eclipse to create Eclipse project files
$sbt eclipse

[info] welcome to sbt 1.3.13 (Oracle Corporation Java 1.8.0_261)
[info] loading settings for project proteomics-build from plugins.sbt ...
[info] loading project definition from /Users/adinasa/Documents/bigdata/proteomics/project
[info] loading settings for project proteomics from build.sbt ...
[info] set current project to MyProject (in build file:/Users/adinasa/Documents/bigdata/proteomics/)
[info] About to create Eclipse project files for your project(s).
[info] Successfully created Eclipse project files for project(s):
[info] MyProject
In Eclipse use the Import Wizard to import Existing Projects into Workspace
If you prefer to use an existing Eclipse installation, you can use the following update sites to upgrade or install the Scala IDE plugin.
- Install m2eclipse-scala plugin for Scala IDE on Maven projects.
- For Eclipse Oxygen (version 4.7)
At Eclipse, make sure you have done all of the following steps:
- Switch to the Scala perspective
- If you have already created or imported the project, you can right-click on the project’s root directory, then choose Scala and then Add Scala Nature.
- Right-click on “ScalaExampleMain” -> “Run As” -> “Scala Application”