Building a real-time big data pipeline (1: Kafka, RESTful, Java)
Published:
Updated on September 20, 2021
Apache Kafka is used for building real-time data pipelines and streaming apps. Kafka helps transmit messages from one system to another (a message broker). Zookeeper is required to run a Kafka Cluster. Apache ZooKeeper is primarily used to track the status of nodes in the Kafka Cluster and maintain a list of Kafka topics and messages. Starting with v2.8, Kafka can be run without ZooKeeper. However, this update isn’t ready for use in production.
Kafka for local development of applications:
There are multiple ways of running Kafka locally for development of apps but the easiest method is by docker-compose. First download Docker Desktop, Docker Hub and SignIn with Docker ID. Docker Compose is included as part of this desktop. docker-compose facilitates installing Kafka and Zookeeper with the help of docker-compose.yml file.
Create a file called docker-compose.yml in your project directory and paste the following:
version: '3'
services:
  zookeeper:
    image: wurstmeister/zookeeper
    ports:
      - "2181:2181"
  kafka:
   image: wurstmeister/kafka
    ports:
      - "9092:9092"
    environment:
     KAFKA_ADVERTISED_HOST_NAME: localhost
     KAFKA_ZOOKEEPER_CONNECT: zookeeper:2181
     KAFKA_AUTO_CREATE_TOPICS_ENABLE: "true"
    volumes:
     - /var/run/docker.sock:/var/run/docker.sock
The above compose file defines two services: zookeeper and kafka. The zookeeper service uses a public zookeeper image and he kafka service uses a public kafka image pulled from the Docker Hub registry.
1. Start the Kafka service
Open a terminal, go to the directory where you have the docker-compose.yml file, and execute the following command. This command starts the docker-compose engine, and downloads the images and runs them.
$docker compose up -d
[+] Running 3/3
 ⠿ Network "kafka_default"      Created			4.1s
 ⠿ Container kafka_kafka_1      Started			4.6s
 ⠿ Container kafka_zookeeper_1  Started			5.5s
To list all running docker containers, run the following command
$docker compose ps
NAME                SERVICE             STATUS              PORTS
kafka_kafka_1       kafka               running             0.0.0.0:9092->9092/tcp
kafka_zookeeper_1   zookeeper           running             0.0.0.0:2181->2181/tcp, 22/tcp, 2888/tcp, 3888/tcp
You can shut down docker-compose by executing the following command in another terminal.
$docker compose down
[+] Running 3/3
 ⠿ Container kafka_kafka_1      Removed			6.0s
 ⠿ Container kafka_zookeeper_1  Removed			11.2s
 ⠿ Network "kafka_default"      Removed			2.7s
Start the kafka service and check the ZooKeeper logs to verify that ZooKeeper is working and healthy.
$docker compose logs zookeeper | grep -i binding

zookeeper_1  | 2021-08-30 16:11:37,821 [myid:] - INFO  [main:NIOServerCnxnFactory@89] - binding to port 0.0.0.0/0.0.0.0:2181
Next, check the Kafka logs to verify that broker is working and healthy.
$docker compose logs kafka | grep -i started

kafka_1  | [2021-08-30 16:11:43,780] INFO [SocketServer brokerId=1001] Started 1 acceptor threads for data-plane (kafka.network.SocketServer)
kafka_1  | [2021-08-30 16:11:44,493] INFO [SocketServer brokerId=1001] Started data-plane processors for 1 acceptors (kafka.network.SocketServer)
kafka_1  | [2021-08-30 16:11:44,518] INFO [KafkaServer id=1001] started (kafka.server.KafkaServer)
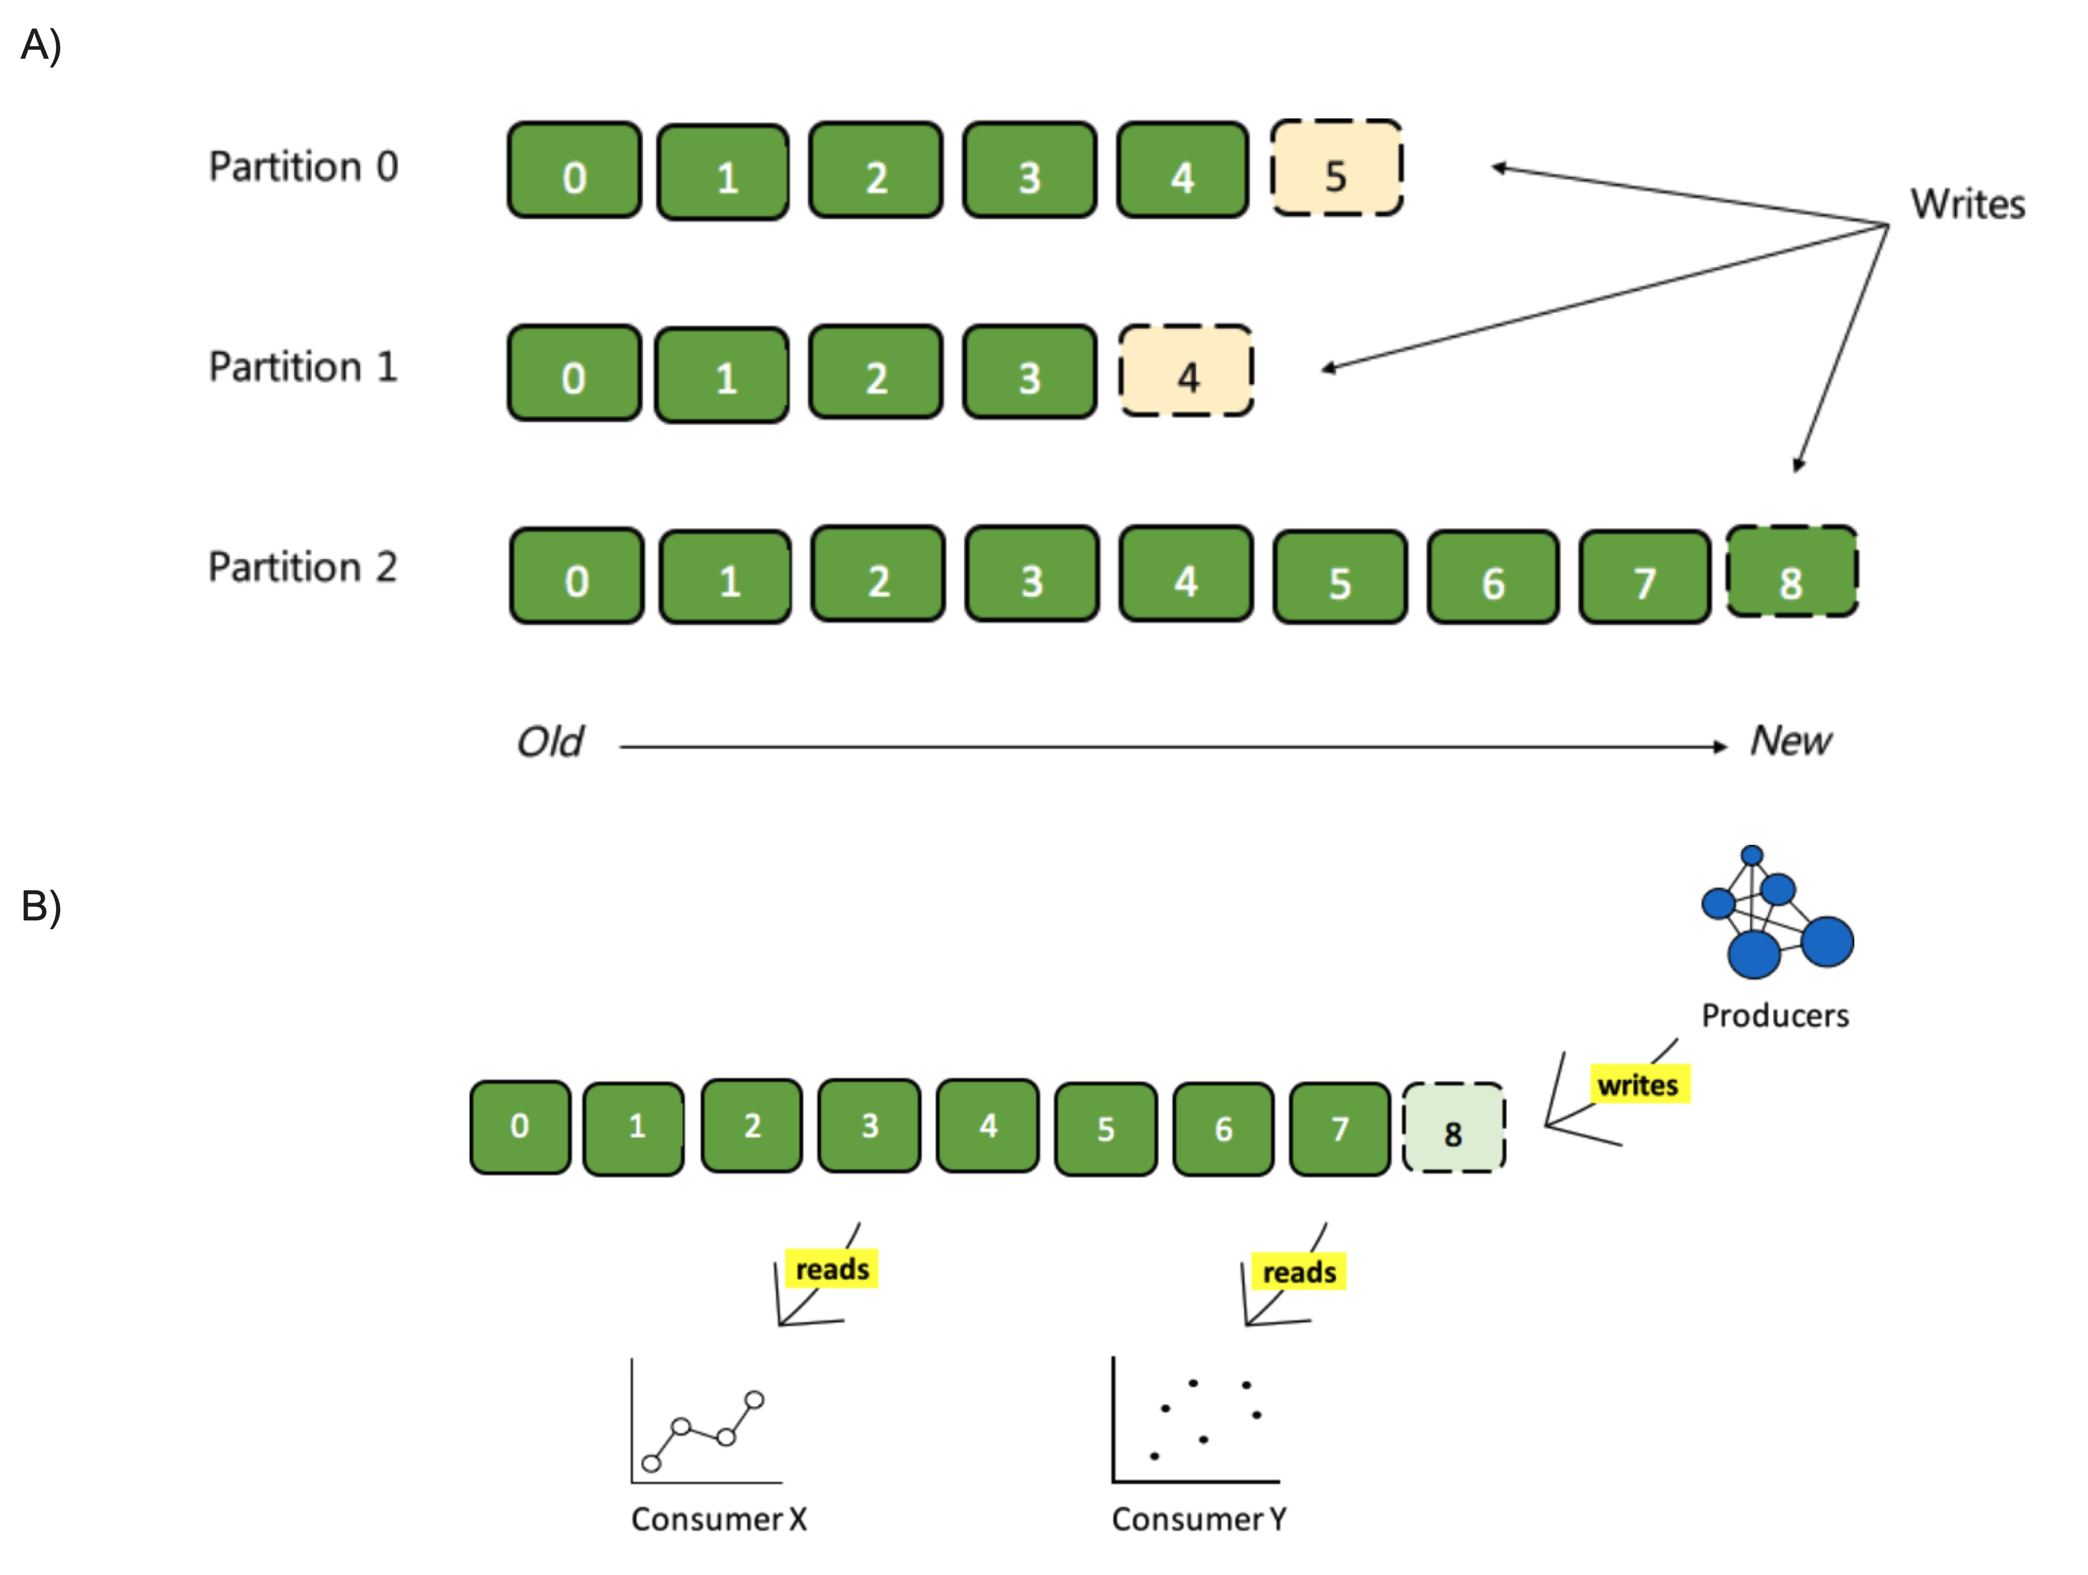
Two fundamental concepts in Kafka are Topics and Partitions. Kafka topics are divided into a number of partitions. While the topic is a logical concept in Kafka, a partition is the smallest storage unit that holds a subset of records owned by a topic. Each partition is a single log file where records are written to it in an append-only fashion.
2. Create a Kafka topic
The Kafka cluster stores streams of records in categories called topics. Each record in a topic consists of a key, a value, and a timestamp. A topic can have zero, one, or many consumers that subscribe to the data written to it.
Use docker compose exec to execute a command in a running container. For example, docker compose exec command by default allocates a TTY, so that you can use such a command to get an interactive prompt. Go into directory where docker-compose.yml file present, and execute it as
$docker compose exec kafka bash
(for zookeeper $docker compose exec zookeeper bash)
Change the directory to /opt/kafka/bin where you find scripts such as kafka-topics.sh.
cd /opt/kafka/bin
Create a new topic or, list or delete existing topics:
bash-4.4# ./kafka-topics.sh \
 --create \
 --topic mytopic \
 --partitions 1 \
 --replication-factor 1 \
 --bootstrap-server localhost:9092
Figure 1. Kafka topic partitions layout (Image source cloudblogs.microsoft.com).
Kafka topics are divided into a number of partitions. Each partition in a topic is an ordered, immutable sequence of records that continually appended.
bash-4.4# ./kafka-topics.sh --list --bootstrap-server localhost:9092
If necessary, delete a topic using the following command.
bash-4.4# ./kafka-topics.sh --delete --topic mytopic --bootstrap-server localhost:9092
3. How to produce and consume messages from kafka Topic using using the command line?
Kafka producers are those client applications that publish (write) events to Kafka, and Kafka consumers are those that subscribe to (read and process) these events. A producer can use a partition key to direct messages to a specific partition. If a producer doesn’t specify a partition key when producing a record, Kafka will use a round-robin partition assignment.
Figure 2. Relationship between kafka components (Image source https://medium.com).
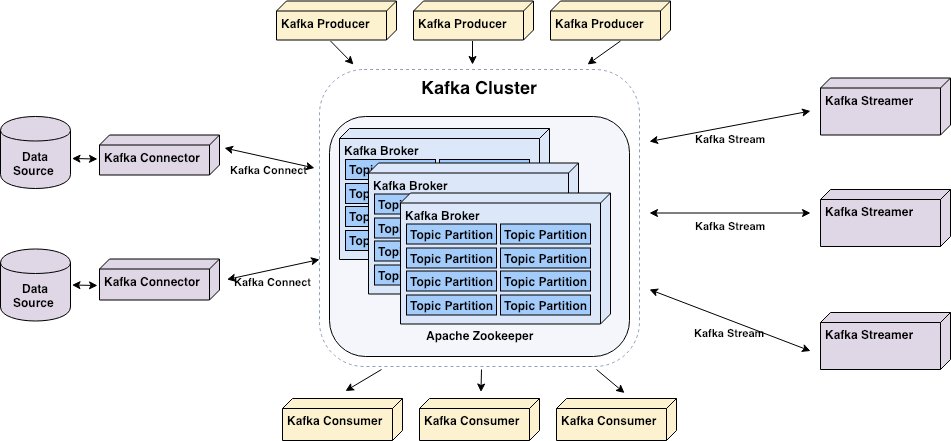
Kafka broker (a.k.a Kafka server/node) is the server node in the cluster, mainly responsible for hosting partitions of Kafka topics, transferring messages from Kafka producer to Kafka consumer and, providing data replication and partitioning within a Kafka Cluster.
The following is a producer command line to read data from standard input and write it to a Kafka topic.
bash-4.4# ./kafka-console-producer.sh \
 --broker-list localhost:9092 \
 --topic mytopic

>Hello
>World
^C
The following is a command line to read data from a Kafka topic and write it to standard output.
bash-4.4# ./kafka-console-consumer.sh \
 --bootstrap-server localhost:9092 \
 --topic mytopic \
 --from-beginning

Hello
World
^CProcessed a total of 2 messages
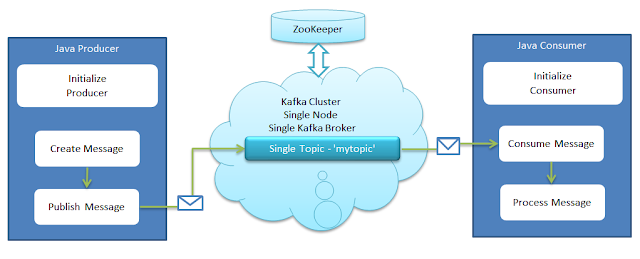
4. How to consume messages from kafka Topic using java web application?
Another way of reading data from a Kafka topic is by simply using a Java Spring Boot.
The following demonstrates how to receive messages from Kafka topic. First in this blog I create a Spring Kafka Consumer, which is able to listen the messages sent to a Kafka topic using the above commandline. Then I create a Spring Kafka Producer, which is able to send messages to a Kafka topic.
Figure 3. Kafka Producer and Consumer in Java (Source blog.clairvoyantsoft.com).
Download Spring Tool Suite4 and install it.
At Eclipse IDE’s Package Explorer click “Create new Spring Starter Project” and
Name: SpringBootKafka
Type: Maven project
Spring Boot Version: 2.5.4
Java Version: 8 Search “kafka” at New Spring Starter Project Dependencies and select “Spring for Apache Kafka“
Click Finish.
The Spring Initializr creates the following simple application class for you.
SpringBootKafkaApplication.java
@SpringBootApplication
public class SpringBootKafkaApplication {
 public static void main(String[] args) {
  SpringApplication.run(SpringBootApplication.class, args);
 }
}
@SpringBootApplication annotation is equivalent to using @Configuration, @EnableAutoConfiguration, and @ComponentScan. As a result, when we run this Spring Boot application, it will automatically scan the components in the current package and its sub-packages. Thus it will register them in Spring’s Application Context, and allow us to inject beans using @Autowired.
Configure Kafka through application.yml configuration file
In Spring Boot, properties are kept in the application.properties file under the classpath. The application.properties file is located in the src/main/resources directory. Change application.properties file to application.yml, then add the following content.
spring:
  kafka:
   consumer:
    bootstrap-servers: localhost:9092
    group-id: group_test1
    auto-offset-reset: earliest
    key-deserializer: org.apache.kafka.common.serialization.StringDeserializer
    value-deserializer: org.apache.kafka.common.serialization.StringDeserializer
Create a Spring Kafka Consumer class
Create a class called KafkaConsumer.java and add a method with the @KakfaListener annotation.
import org.springframework.kafka.annotation.KafkaListener;
import org.springframework.stereotype.Service;

@Service
public class KafkaConsumer {
 @KafkaListener(id = "group_test1", topics = "mytopic")
 public void consumeMessage(String message) {
  System.out.println("Consumed message: " + message);
 }
}
In most typical Spring Framework applications, we have distinct layers like data access, presentation, service, business, etc.
@Component allows us to auto-detect implementation classes through the classpath scanning.
@Service annotates classes at the service layer.
@Repository annotates classes at the persistence layer, which will act as a database repository.
How to run Spring Boot web application in Eclipse?
In eclipse Project Explorer, right click the project name -> select “Run As” -> “Maven Build…”
In the goals, enter spring-boot:run
then click Run button.
If you have Spring Tool Suite (STS) plug-in, you see a “Spring Boot App” option under Run As.
Run the following console producer which will enable you to send messages to Kafka:
bash-4.4# ./kafka-console-producer.sh \
 --broker-list localhost:9092 \
 --topic mytopic

>Hello
>World
^C
Try sending a few messages like above (Hello, World etc) and watch the application standard output in the Eclipse shell where you are running your Spring Boot application.
Eclipse Console:
 .   ____          _            __ _ _
 /\\ / ___'_ __ _ _(_)_ __  __ _ \ \ \ \
( ( )\___ | '_ | '_| | '_ \/ _` | \ \ \ \
 \\/  ___)| |_)| | | | | || (_| |  ) ) ) )
  '  |____| .__|_| |_|_| |_\__, | / / / /
 =========|_|==============|___/=/_/_/_/
 :: Spring Boot ::                (v2.5.4)

...
...
...

Consumed message: Hello
Consumed message: World
5. How to produce and consume messages from Kafka Topic using java web application?
The above KafkaConsumer.java receives messages that were sent to a Kafka Topic (like consumer command line).
The followng KafkaProducer.java send messages to a Kafka Topic (like producer command line).
Make sure to have spring-web dependency in pom.xml file.
<dependency>
  <groupId>org.springframework.boot</groupId>
  <artifactId>spring-boot-starter-web</artifactId>
</dependency>
Update application.yml file.
server:
  port: 8080
spring:
  kafka:
   consumer:
    bootstrap-servers: localhost:9092
    group-id: group_test1
    auto-offset-reset: earliest
    key-deserializer: org.apache.kafka.common.serialization.StringDeserializer
    value-deserializer: org.apache.kafka.common.serialization.StringDeserializer
   producer:
    bootstrap-servers: localhost:9092
    key-serializer: org.apache.kafka.common.serialization.StringSerializer
    value-serializer: org.apache.kafka.common.serialization.StringSerializer
Add two new java classes KafkaProducer.java and KafkaController.java
KafkaProducer.java class
import org.springframework.beans.factory.annotation.Autowired;
import org.springframework.kafka.core.KafkaTemplate;
import org.springframework.stereotype.Service;

@Service
public class KafkaProducer {
 private static final String TOPIC = "mytopic";
 @Autowired
 private KafkaTemplate<String, String> kafkaTemplate;
 public void sendMessage(String message) {
  kafkaTemplate.send(TOPIC, message);
  System.out.println("Produced message: " + message);
 }
}
KafkaController.java class
We typically use @Controller in combination with a @RequestMapping annotation for request handling methods. @RestController is a specialized version of the controller. It includes the @Controller and @ResponseBody annotations, and as a result, simplifies the controller implementation.
import org.springframework.beans.factory.annotation.Autowired;
import org.springframework.web.bind.annotation.PostMapping;
import org.springframework.web.bind.annotation.RequestMapping;
import org.springframework.web.bind.annotation.RequestParam;
import org.springframework.web.bind.annotation.RestController;

@RestController
@RequestMapping(value="/kafka")
public class KafkaController {

 private final KafkaProducer producer;

 @Autowired
 KafkaController(KafkaProducer producer){
  this.producer = producer;
 }

@PostMapping(value="/publish")
 public void messagePrint(@RequestParam(value="message", required = false) String message) {
  this.producer.sendMessage(message);
 }
}
@GetMapping is specialized version of @RequestMapping annotation that acts as a shortcut for @RequestMapping(method = RequestMethod.GET).
@PostMapping is specialized version of @RequestMapping annotation that acts as a shortcut for @RequestMapping(method = RequestMethod.POST).
Behind the scenes, spring looks for a query string parameter message and extracts its value from the request. Then it invokes the request handler messagePrint(message) and passes the param value as an argument.
6. Run Spring Boot Web application and test the controller by executing a POST kafka/publish request and pass a query string parameter – message.
curl --request POST "http://localhost:8080/kafka/publish?message='hello'"
OR make POST request using Postman.
Select POST and use the API http://localhost:8080/kafka/publish
Body: form-data KEY: message VALUE: hello
Finally click send.
See Eclipse Console for messages:
...
...
...
2021-08-30 17:34:14.022  INFO 3851 --- [nio-8080-exec-2] o.a.kafka.common.utils.AppInfoParser     : Kafka version: 2.7.1
2021-08-30 17:34:14.023  INFO 3851 --- [nio-8080-exec-2] o.a.kafka.common.utils.AppInfoParser     : Kafka commitId: 61dbce85d0d41457
2021-08-30 17:34:14.023  INFO 3851 --- [nio-8080-exec-2] o.a.kafka.common.utils.AppInfoParser     : Kafka startTimeMs: 1630359254022
2021-08-30 17:34:14.033  INFO 3851 --- [ad | producer-1] org.apache.kafka.clients.Metadata        : [Producer clientId=producer-1] Cluster ID: mzjgWnhAS5GIknFkngu7qw

Produced message: hello
Consumed message: hello
You can shut down docker-compose by executing the following command in another terminal.
bash-4.4# exit

$docker compose down
[+] Running 3/3
 ⠿ Container kafka_kafka_1      Removed                                                                                                                    5.2s
 ⠿ Container kafka_zookeeper_1  Removed                                                                                                                   11.2s
 ⠿ Network "kafka_default"      Removed
Further reading…
What is ZooKeeper & How Does it Support Kafka?
Understanding Kafka Topic Partitions
The Power of Kafka Partitions : How to Get the Most out of Your Kafka Cluster?